Sunday, December 03, 2017

Faux leather tassels!

Tonight I did a facebook live in the Cricut Design Space Facebook group. I showed how to make these tassels


Here's the video: 

I created a file with 3 different lengths. 7.5", 6" and 3.8". In the video I make a 7.5" in tan, and 6" in blue sapphire.

I purchased a 12" cord and folded it in half for the tan, and ended up with a 11" cord for the blue. Shorter cords exist, I just haven't found one yet! If you happen to find a 7" cord for a good price, let me know!

and as promised here's the file: https://design.cricut.com/#/design/75521581

And please, follow me on facebook: Projects by Polis and Instagram: @Polispinterestproject


Saturday, November 18, 2017

The Knockout Technique

Hi friends! I was scrolling on facebook, I saw this super cute Christmas desgin using the knock-out method by Savanna Marshall.  What that is is where you have words and knock-out an image in those words. Like christmas lights knocked out of the words Merry Christmas!


So I made these 2 designs in Cricut Design Space and asked the group which one I should make, 200 comments later, it was pretty evenly split on which I should make. So I made both! 


If you want to learn how to do this,, read on! If you want this file go like my Facebook page here: Projects by Polis and I've posted the links! Please like my page while you're there! The entire image is produced in Cricut Design Space, you may have to pay for the lights on on option A. But it’s only $0.99! 

I also am available to teach you this method in person or via video chat! 

  • You’ll want to use the font IMPACT and get the letters as close together as possible. Also, make sure you make the lines as close together as possible.
  • Next you’ll weld the text together 
  • Duplicate it. 
  • Hide the duplicate for later use. 
  • You’ll want to choose an image to knock-out. 
    • Start with selecting an image - for the purpose of this lesson I picked a simple Christmas tree. If it’s multiple layers, you’ll need to weld it all together. 


  • Next, I will center the tree over the text, size it to be the same height as the text, and choose slice. This action will turn the entire image to a single color, in this instance, grey.


  • You want to hide the sliced part of the tree. This part: 


  • Next, you want to un-hide the text that you duplicated earlier and put it into position over your sliced tree. 
  • Hide the part with the tree sliced out. 
  • Change the colors so that they match the materials you will use. 
  • You’ll cut these 2 pieces and voila! You’ve done your first knock-out! 
    • (You would cut the red & green part, you can just delete or hide the grey)


This is a video showing how to do it: 


Friday, November 10, 2017

Make something you love HOUSTON!

AHHH, So Cricut came to town on Monday! I bought my ticket right away and Cricut didn’t disappoint! It was held at the JW Marriott in the Galleria and they have an event hall. So when you walked in, there were a bunch of Cricut Makers set up showing a variety of projects. This photo is from Patty Arnett. I took a picture and put it on my Instagram story, but didn’t save it(shocker: It was my first time using instagram’s story feature and I forgot to save!)


Later this year, Cricut is going to release a Knife blade that will cut thick chipboard and thin balsa wood. This blade was the primary reason I purchased the Maker, and I’m anxiously awaiting for Cricut to release it!

There were two projects that we got to make.  I was on the blue team, so we made the keychain first. This is the project image on the left, and mine one the right, mine did not look as good, because I haven’t sewn in at least 15 years.

I was at Joann’s last night teaching a class, and I confirmed that they had all the supplies for this project, and duh, they did. I didn’t buy the supplies, because these would make great easy to make Christmas gifts!


The other project involved slicing, attaching, welding to make a frame for a photo we had the opportunity to take at one of the stations. I’ve seen this beautiful set-up from Damask love and other cricut I️ Was beyond thrilled that they set up this photo booth and even had a printer for a later project!


That's all for now! Thanks for stopping by!


Wednesday, April 12, 2017

Poinsettia's in April!

So I have a friend that's planning a Christmas themed wedding! She has asked me to come up with an unique idea for her place cards! Last night, it suddenly came to me; poinsettias! So I took to pinterest this morning and looked up "Poinsettia Place Cards" for inspiration. I quickly was able to make a mock-up using the 3D floral decor cartridge. . .but my sister said it looks like a kids craft. . .

So I went back to the blog (you can find it here) to see how she made hers. She has a silhouette, and I have a Cricut so her file was useless to me. So I had to make my own! 

I used the 3D Floral Home Decor cartridge(it's available with your Cricut Subscription!) I used the Fall Leaf and the poinsettia, welded them together to create the long flower like Cat used in her post. The one on the left is before I welded it, then one one the right is the resulting petal. 

I then duplicated the petals, so I had 6, and arranged them around a circle, and welded it together and duplicated the petal circle in order to have 3, and then made each one a different size. The largest is 2.59 x 2.76, the medium one is 2.05 x 2.19 and the smallest is 1.5 x 1.6. The leaves are 2.5", pollen is .4"


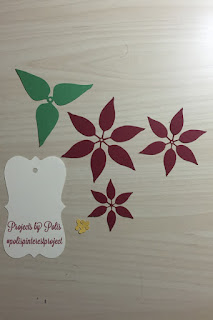
I used the leaves and pollen from the original poinsettia image, and this is what the resulting cut was!


I then began assembly! (I used a thin paintbrush to curl the petals)


Here's the finished project!

And here's a link to the project using a cricut: http://bit.ly/prettypoinsettia


I'm looking forward to using these poinsettias when Christmas finally arrives!